HQPlayer Desktop
HQPlayer Desktop is a software audio player for Windows, macOS and Linux operating systems for stereo and multichannel recordings. It supports streaming services and features both advanced upsampling and convolution. More information about HQPlayer Desktop can be found here.
The software presented on this webpage has been tried and tested by us. However, please do note that it comes from a third party that is not connected to myHRTF in any way. Hence, we cannot guarantee that this software will work on your PC or laptop as described below.
Installation
Download the latest version of HQPlayer Desktop here and install it on your PC or laptop. The generous trial period allows you to test it before making a purchase.
Configuration for Stereo
- For Windows users: go to Files in the menu and select Settings....
For macOS users: go to HQPlayer5Desktop in the menu and select Preferences.... - Go to the Advanced tab and set DSP pipelines to 4.
- You may increase the FFT filter length in case you encounter choppy sound reproduction from a lack of processing power.
- Leave all other settings as is and confirm by clicking OK.
- Got to Tools in the menu and select Channel balance.
- Set the Level for the Left and Right channel to -10.0 dB. More information why this is required can be found in the FAQ.
- Leave all other settings as is, tick Enabled and confirm by clicking OK.
- Go to Matrix in the menu and select Pipeline setup... and make the following settings:
Row 1: set Source Ch to 1 and Mix Ch to 1.
Row 2: set Source Ch to 1 and Mix Ch to 2.
Row 3: set Source Ch to 2 and Mix Ch to 1.
Row 4: set Source Ch to 2 and Mix Ch to 2. - Click Browse to select filters from Standard Stereo or Wide Stereo or Crosstalk-Free Stereo contained in myHRTF for HQPlayer as follows. IMPORTANT: clear the Process field next to the Browse button before changing filters, otherwise filters are mixed instead.
Row 1: select the filter with the filename ending with ..._LL_352.wav.
Row 2: select the filter with the filename ending with ..._LR_352.wav.
Row 3: select the filter with the filename ending with ..._RL_352.wav.
Row 4: select the filter with the filename ending with ..._RR_352.wav. - Leave all other settings as is, tick Enabled and confirm by clicking OK.
- You can save settings in order to switch between different filters conveniently:
Write a preset name in the input field and click Save.
To switch between filters, select a setting from the dropdown menu and click Load.
To delete a saved setting, select it from the dropdown menu and click Delete.
Confirm by clicking OK.


Configuration for Multichannel
- For Windows users: go to Files in the menu and select Settings....
For macOS users: go to HQPlayer5Desktop in the menu and select Preferences.... - Go to the Advanced tab and set DSP pipelines to 16, see picture above.
- You may increase the FFT filter length in case you encounter choppy sound reproduction from a lack of processing power.
- Leave all other settings as is and confirm by clicking OK.
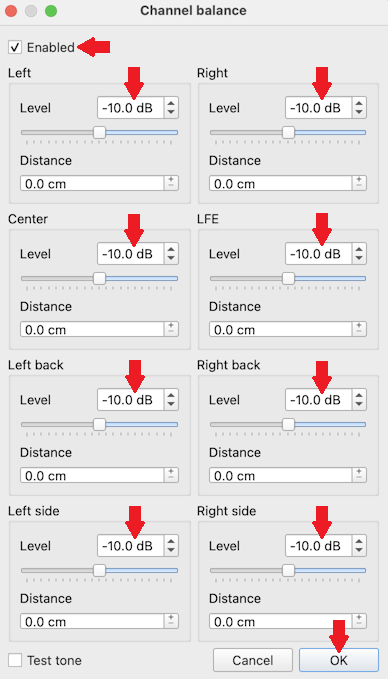
- Got to Tools in the menu and select Channel balance.
- Set the Level for the Left, Right, Center, LFE, Left back, Right back, Left side, and Left side channel to -10.0 dB, tick Enabled and confirm by clicking OK, see above for details.
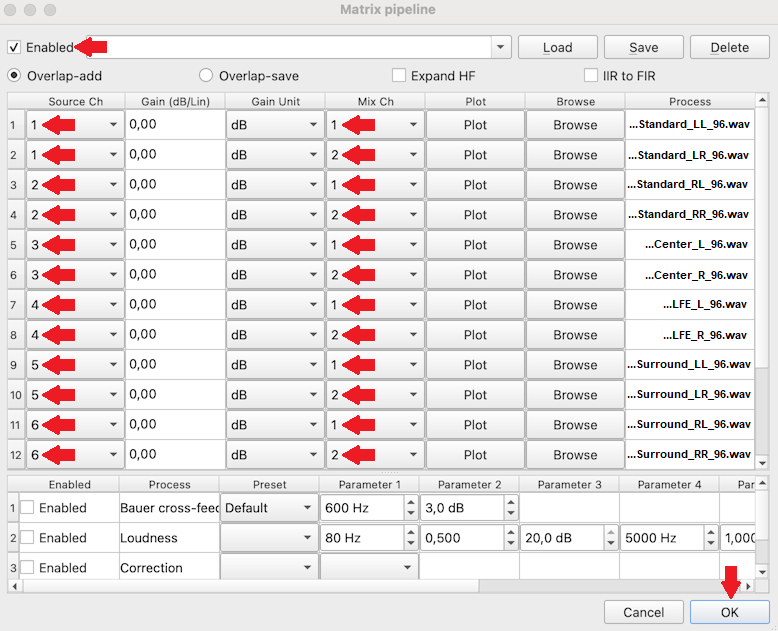
- Go to Matrix in the menu and select Pipeline setup... and make the following settings:
Row 1: set Source Ch to 1 and Mix Ch to 1.
Row 2: set Source Ch to 1 and Mix Ch to 2.
Row 3: set Source Ch to 2 and Mix Ch to 1.
Row 4: set Source Ch to 2 and Mix Ch to 2.
Row 5: set Source Ch to 3 and Mix Ch to 1.
Row 6: set Source Ch to 3 and Mix Ch to 2.
Row 7: set Source Ch to 4 and Mix Ch to 1.
Row 8: set Source Ch to 4 and Mix Ch to 2.
Row 9: set Source Ch to 5 and Mix Ch to 1.
Row 10: set Source Ch to 5 and Mix Ch to 2.
Row 11: set Source Ch to 6 and Mix Ch to 1.
Row 12: set Source Ch to 6 and Mix Ch to 2.
For surround 7.1, make the following settings in addition:
Row 13: set Source Ch to 7 and Mix Ch to 1.
Row 14: set Source Ch to 7 and Mix Ch to 2.
Row 15: set Source Ch to 8 and Mix Ch to 1.
Row 16: set Source Ch to 8 and Mix Ch to 2. - Click Browse to select filters from the Surround folder contained in myHRTF for HQPlayer for each room / speaker distance as follows. IMPORTANT: clear the Process field next to the Browse button before changing filters, otherwise filters are mixed instead.
Row 1: select the filter with the filename ending with ..._Standard_LL_96.wav (or ..._Wide_LL_96.wav for surround 5.1 wide).
Row 2: select the filter with the filename ending with ..._Standard_LR_96.wav (or ..._Wide_LR_96.wav for surround 5.1 wide).
Row 3: select the filter with the filename ending with ..._Standard_RL_96.wav (or ..._Wide_RL_96.wav for surround 5.1 wide).
Row 4: select the filter with the filename ending with ..._Standard_RR_96.wav (or ..._Wide_RR_96.wav for surround 5.1 wide).
Row 5: select the filter with the filename ending with ..._Center_L_96.wav.
Row 6: select the filter with the filename ending with ..._Center_R_96.wav.
Row 7: select the filter with the filename ending with ..._LFE_L_96.wav.
Row 8: select the filter with the filename ending with ..._LFE_R_96.wav.
Row 9: select the filter with the filename ending with ..._Surround_LL_96.wav (5.1) or ..._RearSurround_LL_96.wav (7.1).
Row 10: select the filter with the filename ending with ..._Surround_LR_96.wav (5.1) or ..._RearSurround_LR_96.wav (7.1).
Row 11: select the filter with the filename ending with ..._Surround_RL_96.wav (5.1) or ..._RearSurround_RL_96.wav (7.1).
Row 12: select the filter with the filename ending with ..._Surround_RR_96.wav (5.1) or ..._RearSurround_RR_96.wav (7.1).
For surround 7.1, make the following settings in addition:
Row 13: select the filter with the filename ending with ..._SideSurround_LL_96.wav.
Row 14: select the filter with the filename ending with ..._SideSurround_LR_96.wav.
Row 15: select the filter with the filename ending with ..._SideSurround_RL_96.wav.
Row 16: select the filter with the filename ending with ..._SideSurround_RR_96.wav. - Leave all other settings as is, tick Enabled and confirm by clicking OK.
- You can save settings in order to switch between different filters conveniently, see details in 12 under Configuration for Stereo above.
Signal Clipping
Setting the Level in Channel balance to -10.0 dB as described above, the clipping of audio signals is virtually impossible since the required headroom has been taken into account during the design of myHRTF Personalized Filters.
Sampling Rate
HQPlayer Desktop adapts the sampling rate of selected myHRTF Personalized Filters to the sampling rate of the music automatically by means of integrated high-quality sampling rate conversion. In order to avoid a loss of resolution, the filters contained in myHRTF for HQPlayer have a sampling rate of 352.8 kHz for stereo and 96 kHz for surround.